HOW TO VALIDATE A CHECKPLOT
WHY USE CHECKPLOTS ?
Part of the process of making high-resolution patterns involves CAD manipulations. Sometimes this is simply setting the tone and polarity, but sometimes there is complex CAD engineering to turn your initial design into a finished product. Where we take every precaution along the way, inevitably things can go wrong. Most often this is always the interpretation of the CAD database - having the chance to verify the data before we make the pattern is vital to ensure you receive what you expect.
There are 4 parts to the verification stage -
- Check the material and mechanical specification
- Check the Polarity and Tone
- Check the data integrity
- Special notes
1. MATERIAL AND MECHANICAL SPECIFICATION
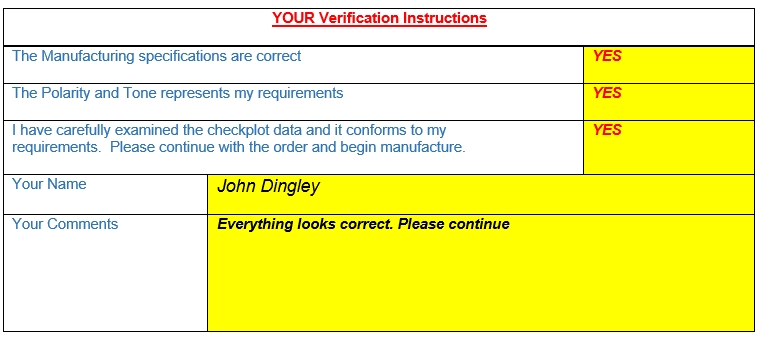
Attached to the email that you receive will be a copy of the latest order confirmation. if any changes have occurred between the first - and final - order confirmation, you will have been previously notified about them. This is your final chance to check that everything complies as far as the mechanical specifications are concerned. If you agree, simply mark the bottom of the checkplot email with a "YES"
2. POLARITY AND TONE
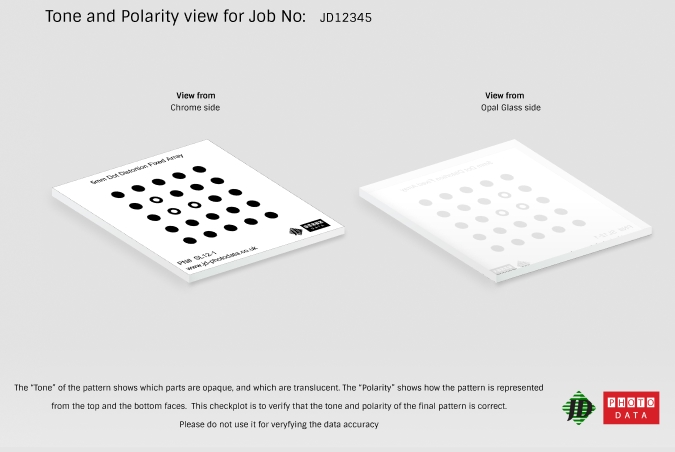
Attached to the email that you receive will be a copy of a 3D layout of the final pattern in a PDF file. This file DOES NOT REPRESENT the final quality of the pattern. it is not meant for checking the accuracy of the data, the data integrity, or the feature quality. It is a low-resolution "mock-up" of the final pattern to help you understand how the general appearance will be when you receive it.
The purpose of the 3D checkplot is to show the polarity of the pattern - this means which side of the pattern is the image, and which side of the pattern is the base material. We suggest putting some text somewhere on the pattern to make this identification easier (you will see when it reads correctly, and when it reads mirrored). Also, there are some patterns that customers create that actually do not matter which is the top and bottom surface because they are identical.
This PDF also represents the "tone" of the pattern - which part of the pattern will be opaque, and which part of the pattern will be transparent. it is important too that this is checked very carefully.
This is your final chance to check that everything complies as far as the polarity and tone are concerned. If you agree, simply mark the bottom of the checkplot email with a "YES"
3. DATA INTEGRITY
The final part of the verification process is to check the data integrity. This means that you need to look at the data file that has been manipulated or created, and check that the features are present/correct/sized appropriately etc.
Attached to the checkplot email is either a PDF checkplot, or a CAD file (depending on what you chose during the ordering stage).
For those who have selected a PDF checkplot, these are used to confirm data interpretation, not dimensional accuracy or feature definition due to their low resolution (4k dpi maximum). You will need to load the PDF into your viewer, and zoom in closely to the features to determine if they are represented correctly. Remember that the PDF file is low resolution, it will not replicate perfectly the CAD file. However, we do not use this PDF for the imaging process - so the final pattern you receive will be higher quality (or lower if you have chosen 2k dpi patterns) depending on the resolution you have chosen.
For those with a CAD checkplot file, you can view it using our online viewer https://gerber-viewer.ucamco.com/
Simply upload the CAD file ( ZIP file) to the online viewer. You now have the ability to zoom in/out. measure and check all of the details in high resolution.
If you agree, simply mark the bottom of the checkplot email with a "YES"
4. SPECIAL NOTES
The final part is to read any special notes that our CAD engineers have given about the order or the pattern. This part of the checkplot can be used for us to confirm special finishes, or things that we may need to bring to your attention.
If you agree, simply mark the bottom of the checkplot email with a "YES"
FINAL STAGES
When you are happy that everything is correct, mark down as YES the answer to the 3 parts and return this by email. You have chance to add any special notes or comments that you want to bring to the attention of our CAD engineers. If you find problems - do not agree that everything is correct - or wish to find out further information before verifying , please simply reply to the checkplot email and let our staff know your concerns.