
How are Photomasks Made?
The pattern information is created by our customers in a drawing package, often in AutoCAD or other suitable software packages such as L-Edit. The data is sent to us by a variety of methods, such as email or ftp, and then our engineers begin the sometimes-difficult process of preparing the data.
This data is processed into our internal CAD format (Gerber) and transferred to a lithography tool – our mask writer – which then exposes the design onto the mask substrate. We use the same equipment and exposure process for both glass & film photomasks. Depending upon which substrate is used, the mask is then processed according to strictly controlled manufacturing processes in our wet rooms.
Once the manufacturing process is finished, the mask is cleaned and inspected, ready to be shipped to the customer.
The following process flow is a simplified description of these tasks for chrome on glass, and film on polyester – note, however, that there are lots of other tests and inspections that are carried out between nearly all the stages of the process flow.
PROCESS FLOW FOR MANUFACTURING A PHOTO-MASK
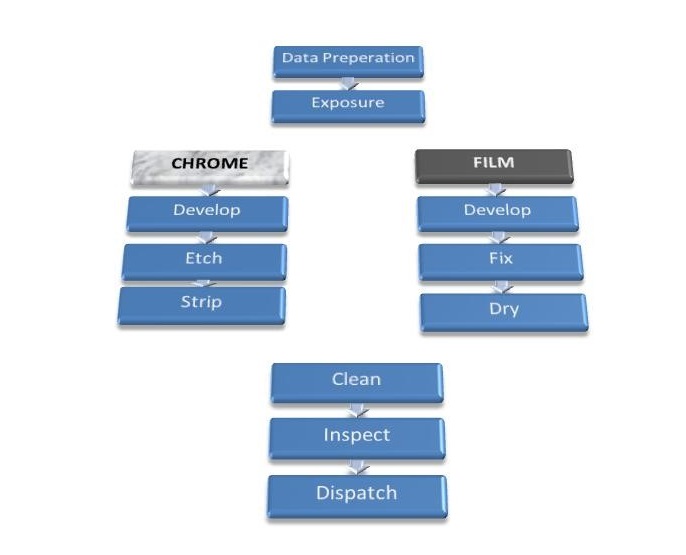
STEP 1 – DATA PREPARATION
Mask data preparation (MDP) is the step that translates an intended set of designs and layers into a form that can be physically written by the photo-mask writer. Usually this involves processing complex polygons into a data format such as Gerber. Typically, a design is delivered to mask data preparation in DXF or GDSii format, and quite often the design needs re-formatting to fix drawing errors that have been created when constructing the design.
Data preparation is a crucial step in the making of a mask – and incorrectly formatted designs are the number one factor in delays in manufacturing. Quite often, the design software just isn’t up-to the job of creating photo-mask designs, and in those cases our engineers must interpret the design requirements, create sometimes complex composite layers and export the complete package ready for the customer to approve.
Once the design has been formatted, a PDF checkplot is sent to the customer for approval before moving on to the next stage.
STEP 2 – EXPOSURE
We have a varity of different imagers, each one specialises in different applications, such as high precision glass, large format glass, large format films etc… so the exposure process is different in each one.
Our main imaging technology is direct write laser. These are lasers mounted onto flat bed, granite-based system capable of different sized substrates. It has a photohead, mounted onto a Z stage of the coordinate table, and the tabkle is driven in the X and Y directions to build up the pattern whilst the laser is exposing.
The Z-axis controls the photohead depth, thus allowing for different material thicknesses to be used.
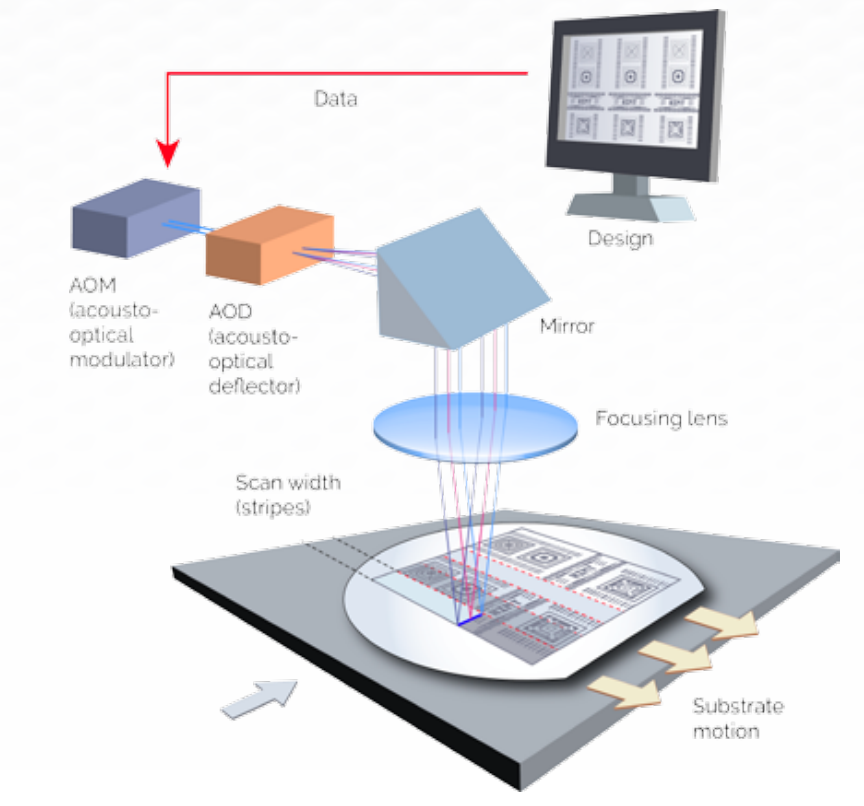
The internal controllers do all the intelligent processing involved with data handling, and the imager communicates data via a high speed network
STEP 3 – CHROME PROCESS
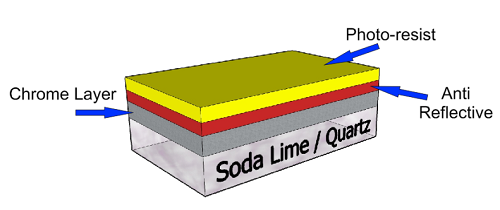
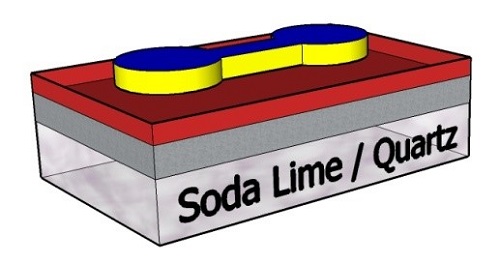
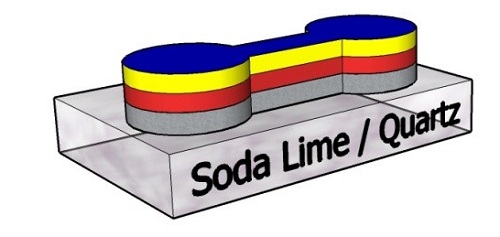
The quartz / glass (substrate) has a layer of chrome on one side. The chrome is covered with an AR (anti-reflective) coating and a photosensitive resist. The substrate with chrome, AR, and resist is known as a blank.
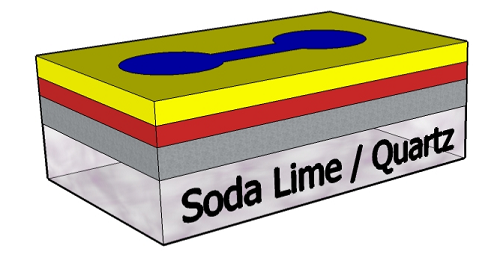
The mask blank is placed on the bed of the mask-writer and imaged. The light sensitive particles on the resist absorb the light, and this creates a latent image in the photoresist layer. Nothing can yet be seen on the mask until the development process.
The next stage is for development. The development of the resist makes the unexposed parts of the resist soft, and these dissolve out of the mask layer. This leaves just the pattern of the device, which now acts as a mask itself to stop the etching of the chrome.
Etching is a chemical process to selectively remove the chrome parts of the mask that are not required. It is one of the most critical steps, and requires inspection before and after this process. The chrome is protected from the etchant where the photo-resist remains, although careful control has to take place to ensure that the image is not under/over etched.
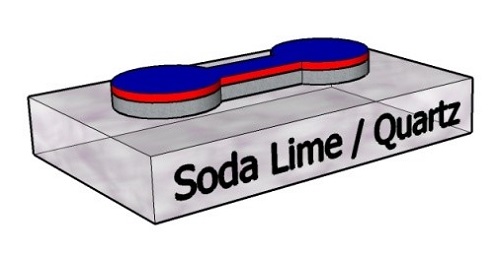
The final chemical process is to strip the remaining photo-resist. This leaves us with chrome on soda lime/quartz pattern, with a thin Anti-reflective coating on top (this coating can further be removed if specifically required).
STEP 4 – POLYESTER FILM PROCESS
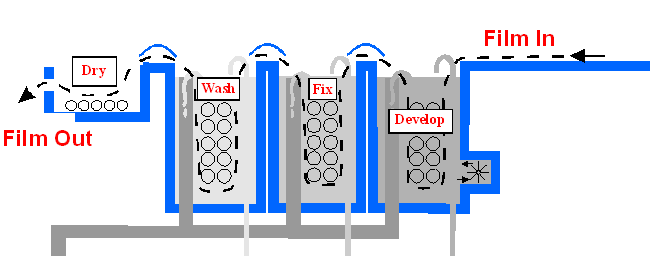
The film is fed into the processor after imaging via a series of rollers and undergoes some chemical changes through the development of the image. Development changes the exposed silver halide crystals into ‘black’ particles in the emulsion layer. The development times and temperatures are critical for maintaining the correct CD of the mask, and the transportation of the film from one step to another needs to be finely tuned. Fresh chemicals are added to the tanks in pre-defined rates according to the mask size, and the chemistry is pumped and re-circulated through the tank to ensure correct dilution.
Fixation is the next chemical process and is necessary to stop the development reactions and obtain a stable image. At this stage, the unexposed silver halide is washed out of the film and the base dyes are cleared. Just like during development, fixer is consumed during the process, and materials washed out of the film build up in the fixer tank. Fixer replenishment helps to counteract these processes.
Following adequate fixation, it is important to wash the film to remove residual processing chemicals and by-products. Again, careful replenishment rates are set to ensure that the wash stage is clean and free of contaminates (which are washed to drain).
The chemical and wash phases are complete and all that remains is to dry the film. At this stage the most important factors are adequate drying of the film while maintaining good dimensional stability.
STEP 5 – CLEAN
The masks go through a robust cleaning process before they are sent to final inspection. The benefit of using a glass-based photo-mask is that they are much easier to clean – the glass and chrome surface can be treated with a variety of chemicals, with no detriment to the image or surface quality, whereas film photomasks are much more delicate and have to be treated with care.
STEP 6 – INSPECT
Once the mask has been processed and cleaned, we then have to inspect it for accuracy/quality / defects and flaws that can sometimes affect the final product.
The inspection process includes a visual inspection, the measurement of an image coupon or similar, and a surface inspection. Orders that have specified Certificate of Conformity requirements will then further go onto the CMM machines for detailed reports.
STEP 7 – DISPATCH
Once an order is finalized, we package the mask carefully and arrange dispatch directly to the customer. We ship by registered methods throughout the world, and you will be emailed your tracking number on dispatch of the mask.

