3" Chrome Photomask
Low Reflective Chrome Photomask (LRC)
3" x 3" (L x W x D)
76mm x 76mm
BASE MATERIAL
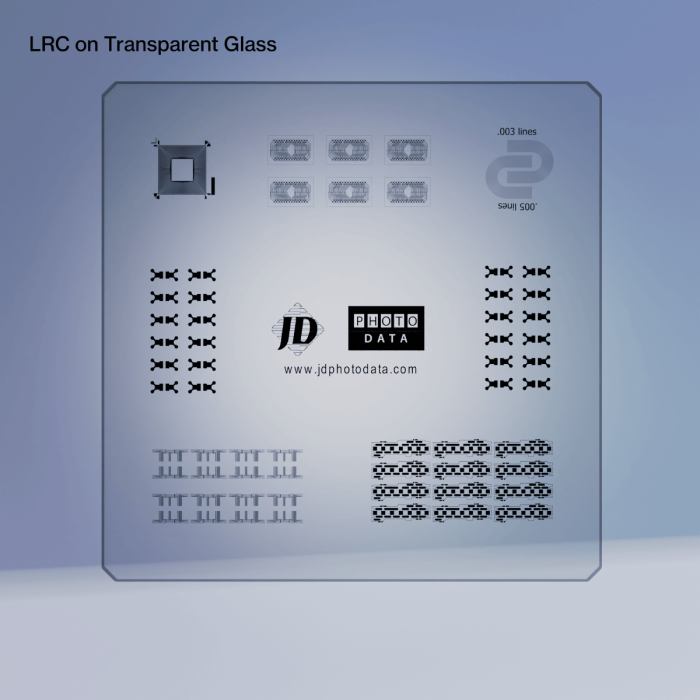
Available on Soda Lime glass with a low reflective chrome pattern etched onto the surface. The chrome material, when viewed from the top surface, will have an oxide layer (CrO) to reduce light reflections. This product is also available on a quartz substrate if required, and other materials as a special order product. See SPECIFICATIONS for further technical details.
CHOOSING RESOLUTIONS
We can write masks at 4 different resolutions, called "classes". The higher the Class, the better the quality. For each increase in Class, there will be a 2x improvement in the following parameters: Addressability, Minimum Line, Edge Roughness, CD Uniformity, and Alignment Accuracy. Please also see the TAB section SPECIFICATIONS to see the impact that class resolution has on dimensional accuracy and feature tolerances.
Some features are harder than others to replicate on the photomask. For example, a triangle with a 15um base / height will in fact have an apex point that reduces down to zero - these end apex points will be impossible to reproduce accurately regardless of the class chosen - but picking a higher class will reduce the rounding effect at each apex. So, even though Class 1 is capable of reproducing 15um lines, a 15um triangle will be distorted in appearance due to this rounding on the apex points. The same can be said for squares or other polygons with squared corners. If your design uses these type of features (triangles, squares, acute or obtuse corner angles) then pick the highest resolution for your budget.
Sharpness of line edges - especially with rounded draws and arcs - are controlled by the Addressability and Edge Roughness. Again, consider using a higher class resolution if these are important to your design.
Class 1 : This represents a resolution that is drawn with a 8um pixel. Although this resolution may resolve smaller features, we recommend keeping feature sizes above 15um as corner rounding is considerable. Edge sharpness and definition is acceptable for non-critical design types, although designs with arcs/circles and lines running off 90 degree grid may show pixilation. NO features such as lines / circles / spots / squares below 10 um unless on a 'best effort' basis agreed with our technicians.
Class 2 : This represents a resolution that is drawn with a 4um pixel Although this resolution may resolve 4um lines, we recommend keeping feature sizes above 6um. This resolution has good line edge qualities with only a small pixilation along edges. NO features such as circles / spots / squares below 6um unless on a 'best effort' basis previously with our technicians.
Class 3 : This represents our most common resolution for demanding, high precision photomasks. This represents a resolution that is drawn with a 1um pixel, and offers an excellent price / quality balance. This resolution will resolve down to 2 micron lines, and has very good line edge qualities with no pixilation along edges, and corner rounding is minimal on larger features.
Class 4 : This represents our highest resolution, and is drawn with a 0.5um pixel, and is the best quality that we can offer. This resolution will resolve down to 1 micron lines and has excellent line edge qualities with no pixilation along edges.
MIN CD
CD means "Critical Dimension" and is often used to describe the smallest feature on the design. Feature in this instance can mean drawn data, and also spaces between drawn data. Putting a correct value here helps us determine inspection and production processes. Please use the NOTES section if you need to convey to us any other information.
CAD FORMAT
Data formats listed above are only a small section of what is available. Please note that printing based formats such as Corel Draw, PDF, Postscript, SVG, BMP, TIFF etc are not created to allow sub micron positioning, and we often see these formats export data that can be inaccurate at the micron level. For all Class 3 and Class 4 type work, we strongly recomend using Engineering vector type formats such as Gerber, GDSii, DXF, CIF etc. If your chosen format is not listed, please contact us for further information and clarification. We are also able to provide a full drafting service whereby we can create your designs from drawings and descriptions.
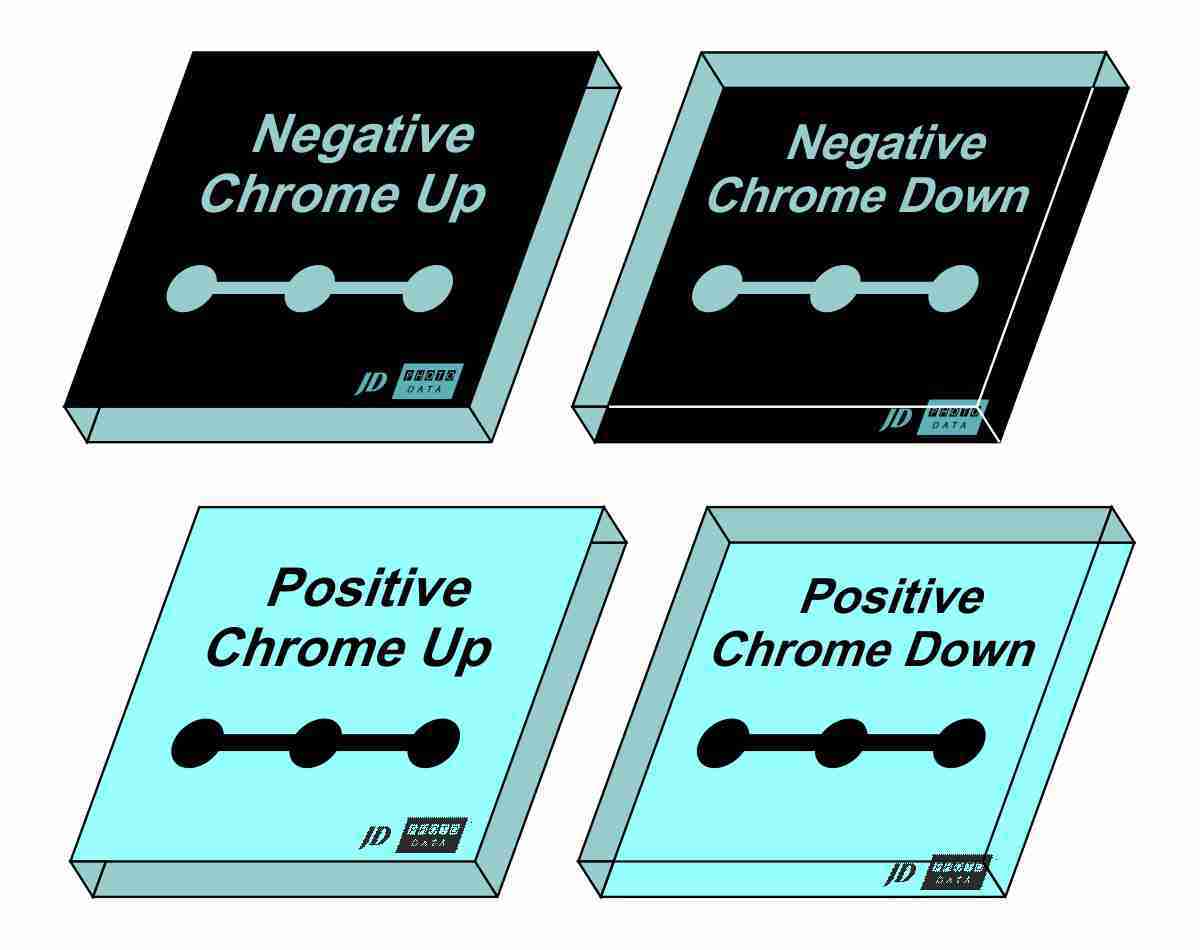 |
POLARITY Masks are normally referred to as Clearfield (positive) & Darkfield (negative) Positive means that the data you have drawn in CAD will be Chrome on the mask, with the background (the field) being clear glass. Negative is the opposite of this, where the items drawn on CAD will be clear and the background will be chrome. We also need to know which way round the mask has been designed on your screen. The easiest way to select this is to add some reference text (anything you like) to the design somewhere - maybe in the corner - and then specify if the text needs to be right reading or wrong reading. Need further clarification ? See our instructional video here..... |
PRODUCTION SCHEDULE
Our standard production turnaround is 3-4 days from receipt of the artwork, purchase order and related documents. We generally send checkplots with every order, and it is vital that these are replied to within a short delay in order that we can meet the schedule required. The production schedule assumes the original data package is correct and does not need to undergo revisions or changes. For large volume orders, or large photomasks on high resolutions, please enquire before ordering premium services.
Standard (4 days) : This is our standard service, and whilst we get 99% of orders shipped within this period, these are guidelines only and may change in periods of high demand. Where data packages are good, and all paperwork is completed promptly, we can often ship early. Expected return of checkplot by customer is within 4 hours. Any orders received after 1pm will assume day 1 to be the following day.
2 Days : A premium service. A complete manufacturing package (data/instructions/order) must be with us by no later than 11.00am. Expected return of checkplot by customer is within 1 hour.
Sameday: A premium service. A complete manufacturing package (data/instructions/order) must be with us by no later than 9.30am. Does not include Class 4 products. Expected return of checkplot by customer is within 30 mins.
8 Days: This is a discounted service for orders that are not urgent.
INSPECTION
Standard : We firstly inspect the piece by eye for flaws, design inaccuracies and contaminations. We also inspect a test coupon (placed in the bottom corner of the mask) for line width accuracy and edge definition. Next we measure the overall dimension of the mask, and record both of these measurements on our internal inspection records. Finally, we find the CD of the mask, measure that, record it, and also take a digital photo that is saved with the inspection log. We use Nikon MM40 at 900x magnification and an OGP ZIP 300 at 400 x magnifications for this.
Certificate of Conformance: In addition to the standard inspection process described above, we will also supply a printed Certificate of Conformance.
Certificate of Measurement : By selecting this option during the ordering process, we will inspect upto 10 customer defined measurements, with customer supplied tolerances. You will need to send us a document, or a separate layer of the design, showing us where you want us to take the measurements from. There can be upto 10 positions defined by the customer. These dimensions are then programmed on the co-ordinate measuring system and the mask is compared to this unique program. A certificate of measurement /conformity is given if the mask passes the inspection process. Additional positions can be requested if required.
CHECKPLOT
A method of sending an email copy of the design for verification before the mask is written. The ‘PDF Checkplot” is a low resolution (4000 dpi) graphic representation of the final photomask - the quality of the PDF does not represent the quality of the final photomask, it is a "gross overview". You must approve this by email before we can proceed.
For more accurate checkplot representation , it is best to send you a detailed CAD checkplot which will represent the design perfectly – in high resolution – and gives you the ability to also measure. You do not need to install any special software, we will give you the link to our online CAD viewer at the time of the checkplot.
YOUR DRAWING NUMBER
Please let us know the CAD file name / number so that we can tie together the uploaded data and the order.
NOTES
Here you can inform us of any other requirements or specifications regarding the order.
Please see the TECHNICAL sections, DOWNLOAD sections and FAQ for further information. If you still require clarification, pleas either email or click for LIVE SUPPORT.
MECHANICAL PROPERTIES
|
|
METRIC |
|
MATERIAL SIZE |
|
|
THICKNESS |
1.5 ± 0.1 Soda Lime |
|
FLATNESS |
5um Soda Lime |
FEATURE TOLERANCES
There are two different values that we specify for tolerances. The first is a ‘feature tolerance’, which equates to one specific feature (also known as CD or Critical Dimension). So, if part of your mask design has a 12um channel and this is a critical feature, you can use the table below to work out possible deviations to the channel width, depending upon which resolution you choose. As a rule, the higher the resolution, then the more accurate the individual feature size will be.
|
Resolution
|
Material |
Tolerance |
|
CLASS 1 |
64k dpi on chrome photomask |
0.8um + 5% host |
|
CLASS 2 |
128k dpi on chrome photomask |
0.6um + 5% host |
|
CLASS 3 |
256k dpi on chrome photomask |
Max 0.4um |
|
CLASS 4 |
512k dpi on chrome photomask |
Max 0.2um |
All figures above in Microns....
Example, at Class 2 resolution a 10um line would have a tolerance of (0.6 + 0.5) = 0.9, but this
is greater than the maximum deviated amount of 0.8, so end result is Tolerance = +/- 0.8um
DIMENSIONAL TOLERANCES
The second tolerance that customers ask us about is that of overall dimensional tolerances. These refer to the tolerances over a distance greater then 5mm – in layman’s terms, people ask us ‘how accurate will the mask be’ and these guidelines should go somewhere towards providing the tolerances in overall dimensions ,depending upon the resolution chosen. Again, it goes without saying that the higher the resolution, then the more accurate the final mask.
|
Resolution
|
Microns |
|
|
where L is measuring length in MM and the resulting |
|
CLASS 1 |
= 6.4 + (L * 0.016) um |
|
CLASS 2 |
= 1.6 + (L * 0.008) um |
|
CLASS 3 |
= 0.6 + (L * 0.004) um |
|
CLASS 4 |
= 0.2 + (L * 0.001) um |
All figures above in Microns....
Example, at Class 3 resolution a 100mm line would have a tolerance of (0.6 + 0.4) = +/- 1.0um
CHROME SPECIFICATION
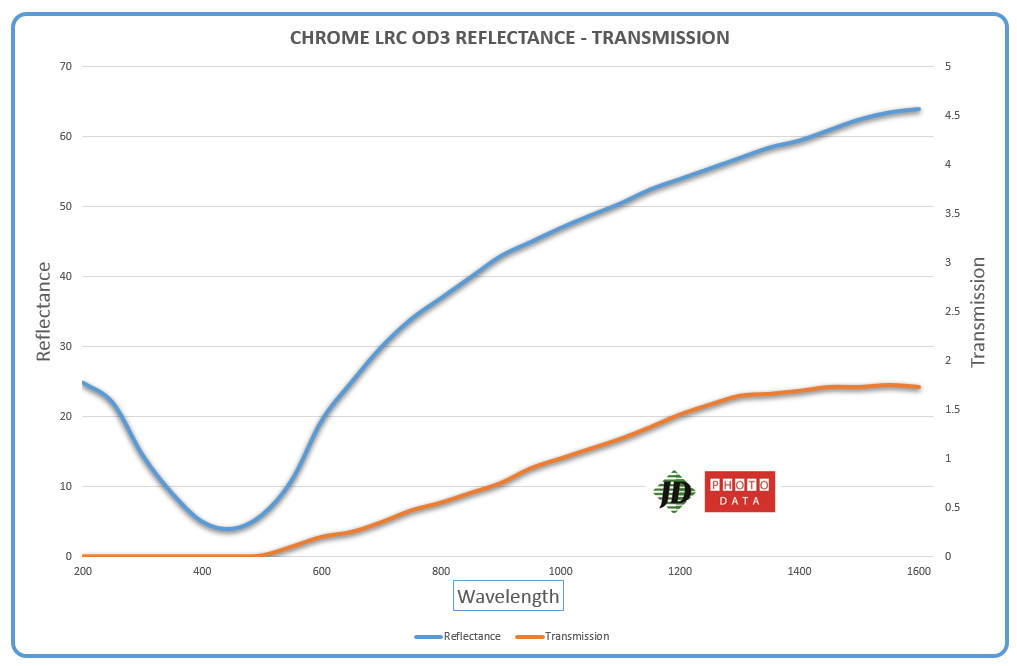
The majority of our standard photomask products are made on a low reflective chrome oxide on the upper surface (11% reflectivity at 436nm wavelengths). By default, this is coated with an Optical Density of >2.8 in the UV bandwidth, and the chrome is coated to approx 0.1um thick. The side of the chrome that is against the glass (the underneath) remains high reflective with no oxide. Alternative thickness, reflectivity and colour are available on demand. Please see the download section for charts.
MATERIAL SPECIFICATION
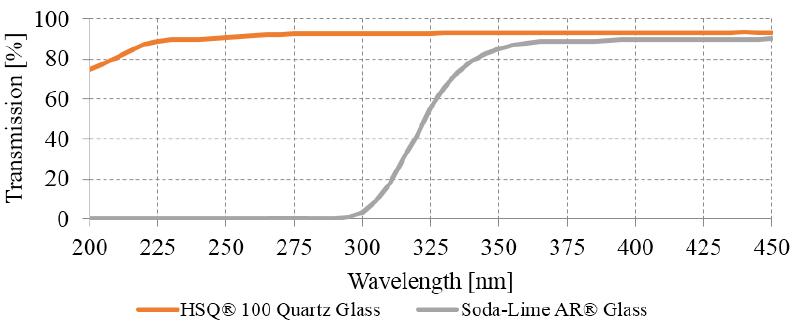
Soda Lime Glass is the most common substrate used for masks, due to its good quality/price ratio. The glass is optically good, very flat and has no imperfections. If used in a photo-lithographic process, glass can be used with a very wide variety of light sources from 350nm upwards, with an excellent UV transparency. Soda Lime glass has a thermal co-efficient expansion of 93 (10-7) which is approximately 10 ppm (parts per million) , and a transmittance value of 88% at 375-450nm, with a glass flatness class of 5um for the smaller plates and 10um for the larger plates. Some of the very big plates of 14" and above, may have a bigger flatness tolerance. For those on a tight budget, we would recommend always using Soda Lime glass where it is suitable.
Quartz or sometimes called Fused Silica is equally a very good substrate, and probably the most common for ‘high-end’ applications such as semiconductor chips. There are a couple of mechanical benefits of quartz over standard soda lime glass – firstly the quartz material is optically pure, with a very high transmission of light even at very low wavelengths of down to 175nm. The second major benefit of quartz is that it remains dimensionally stable even in extreme temperatures, with a thermal co-efficient expansion of 0.4 ppm. Quite often, quartz is the chosen substrate used in laser ablation applications, firstly because of the short wavelengths that are used to ablate with, and secondly because mechanically it can cope with higher temperature fluctuations without damage.
- Quartz thermal expansion co-efficient = 0.4 ppm (parts per million)
- Soda Lime thermal expansion co-efficient = 9.5 ppm (parts per million)
WRITE AREA
The way that the blank materials are coated and handled during their manufacture, results in a "keep out" frame that is 10mm wide around the entire edge of the plate, with a 15mm “keep out” zone in the corners of the plate. We cannot accept to write critical features in this area, although it is possible to add non critical text and reference markers. If you need the design to be closer to the edge, we recommend selecting a larger plate size and then requesting that we cut it down to the required size after imaging process.
DEFECT SPECIFICATIONS
The customer may indicate the size of defects that will affect their process (defect spec). All defects which break these rules must be repaired, or if they cannot be repaired, the mask must be rejected and rewritten. The Customer Defect Specification Form is to be used by customers to inform us of their defect specifications. It may be supplied to cover every order within a given time frame, or on a per order basis. Where no defect spec is given by the customer, we use our own internal standards.
FAQ's
Q: What is the smallest feature that you can do ?
A: This depends upon the resolution that we image at, the material that we use, the tone of the mask, and most importantly the feature type (Spot, square, line etc). This all makes it very hard to give a figure, but as a very rough guide we can make 2-3um on an "everyday" basis and down to 1um and possibly below if we "hold it's hand through production" .
Q: How accurate are the features, what tolerances do you work to ?
A: This is dependant upon the resolution that we image the mask at. The QUICK REFERENCE brochure in the DOWNLOADS section will give you a chart, specifying both feature and dimensional tolerances.
Q: What resolution should i pick ?
A: The higher the resolution, then the sharper the edges of the features, the smaller the features possible, the more accurate the features will be, the sharper the corners in of the features, and also the smoother the circles. Some customers will notice this difference straight away, some will hardly notice any difference. Every customer has different requirements and different priorities. If in doubt, chose a higher resolution to ensure your requirements are met, but we are happy to advise if you send us your database.
Q: What does the term POLARITY mean ?
A: Polarity is the tone of the photomask, and in layman's terms it is what you might call Positive and Negative. When you draw your photomask design on your computer, you need to decide if the objects that you draw are going to be opaque on the photomask- and therefore to block the light - or transparent areas on the photomask. It's best to always think of the data that you draw either being positive data, or negative data. If used in contact lithography, remember, this is polarity or tone of the mask that we manufacture, and NOT the polarity of the wafer you are using.
Q: I've designed my mask with the wrong polarity - what do i do ?
A: We can use the original design file and simply reverse the tone of the mask. This is much easier than supplying new data.
Q: What is Right Reading, Wrong Reading and Mirrored.
A: Some people use the photomask in contact exposure, and others use it as an optical component. Making sure that the design is the corect way round is important. To inform us exactly what you need, it is best to add a title or reference text somewhere on the design and then we can talk in terms of "right reading" or "wrong reading ". Another way of thinking about "wrong reading" is to think of the text being mirrored. Right Reading Chrome side Down is the most common way to describe a photomask that will be used for contact lithography. When you hold the mask in your hands with the chrome side facing down closest to the wafer, the image on the mask will be correct or how it should appear on the wafer. Right Reading Chrome Up is maybe the most common way to describe optical components. However, every customer has different requirements from the next, so you need to inform us via the order form.
Q: So what would Negative Data - Right Reading Chrome Down actualy mean ?
A: Using the above Q&A's as a reference, we can now say that when you are holding the photomask plate in your hand, and the text is reading correctly, then the chrome will be on the underneath surface and the glass support is uppermost. The design will be an exact opposite - in tone - of what you had designed on the computer.
