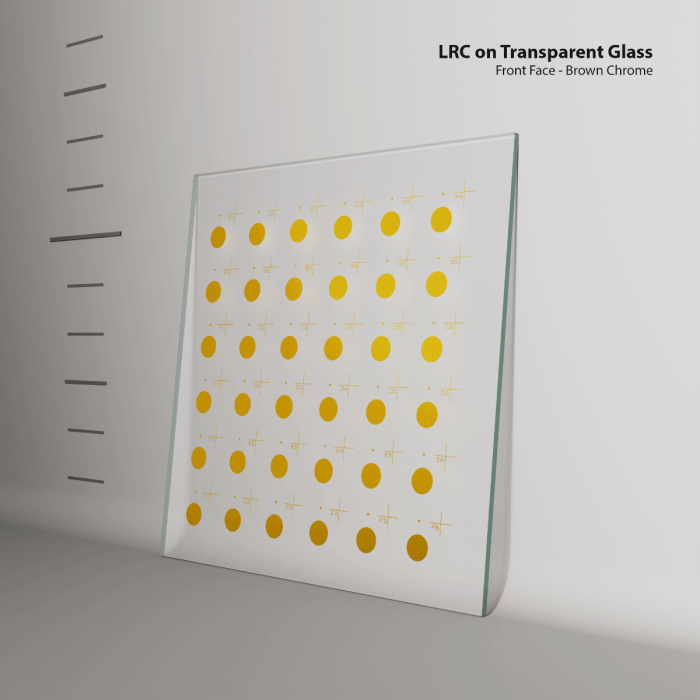
Machine Calibration Plate - 7"
Calibration Grid
CALIBRATION PLATE
This is a precision machine calibration plate containing a series of dots placed very accurately in precise locations, whose position can be captured by camera or video and relayed back to the system drive to ensure that the machine guides/drives/rails are correctly calibrated for position. The dots are placed on a multiple of a 25mm grid, making it easy to calculate any discrepancies found after calibrating. Each grid will be supplied with then excel spreadsheet giving the positions.
The dots are imaged in low reflective chrome pattern - which is hard and durable and allows for regular cleaning of the plate. the colour of the chrome depends on which base material you require.
Each plate type has a pattern of 4 different size, allowing for different resolution camera's to capture them at different zoom levels.
Target 1: Dot size, 10mm
Target 2: Dot size, 1mm
Target 3: Dot size, 0.2 mm
Target 4: Crosshair, 10mm with 0.2mm stroke width
BASE MATERIAL
177mm Soda Lime glass (3mm thick) with a low reflective brown chrome pattern.
200mm White Opal glass with a low reflective black chrome pattern.
See SPECIFICATIONS for details on dimensional stability. Please contact us for availability on Fused Silica (Quartz) materials which have a better thermal expansion coefficient.
COATINGS
We can apply either a solid white, black or translucent plastikote painted coating to the plate. You can choose this to be applied to the front or rear face of the plate. Additionally, anti-glare coatings can be applied to reduce the reflectivity of the top surface when reflected illumination is used.
PRODUCTION TURNROUND
Our standard turnround is 7-10 days for this product. We can offer faster services if required for more urgent orders.
INSPECTION
Full Certificate : The grid is supplied with a measured calibration certificate that is traceable back to NIST standards. Each plate is individually marked with a serial number. Each plate will be supplied with a spreadsheet giving positions, tolerances and temperature co-efficients.
If you still require clarification, please either email or click for LIVE SUPPORT.
ACCURACY
The calibration grid is supplied with a measurement spreadsheet and certificate traceable to NIST standards. Each grid is gauranteed to a tolerance of +/- 2um positional accuracy measured back to zero datum, or +/- 0.75um non cummulative measured across the pitch of 25mm from pattern group to pattern group. For larger calibration plates, it is not possible to measure every single position due to the quantity of positions in X and Y. We are happy to work with you on your measuring requirements.
The dots and crosshairs will have an overall size tolerance of +/- 3um as an individual feature. if you are calibrating "edge to edge" measurements, you need to factor this tolerance into the returned positions, so we always advise using centre-centre positions. We can produce tighter tolerances on individual features if required.
SPECIFICATION
Our calibration plates are produced in conditions of 21deg C. When using the plate, then you must try replicate these conditions wherever the plate is used, otherwise the glass plate will expand or contract with temperature changes. We suggest that you acclimatise the plate at 21 deg C for upto 2 hours before you intend to use it – only then can it be considered to be dimensionally accurate and stable.
Quartz is a material that has a very low thermal expansion – when temperature changes, it hardly expands/contracts at all. However, the cost of quartz material may be prohibitive to some customers. Because of this, depending upon your application, you may be able to continue to use the lower cost soda lime glass as an alternative, by compensating in your calculations for its dimensional change. The thermal expansion of soda lime may be bigger, but it is linear – which means that if you can measure the ambient temperature of the calibration plate, then you can calculate appropriate compensation values into your equations. So, to use a soda lime glass plate for calibration, all we need to know is the current temperature.
Example: We know that the calibration plate was produced at 21 degrees and measured 600mm. When used in calibration, if the temperature is 23 degrees, we know that the plate will now actually measure 600mm + 11.4um = 600.0114 mm, so you can compensate accordingly and use the pass/fail criteria against your compensated figures rather than the original spreadsheet values.
- Quartz thermal expansion co-efficient = 0.5 um per 1 metre per 1 deg C change
- Soda Lime thermal expansion co-efficient = 9.5 um per 1 metre per 1 deg C change
Light Transmission Through Soda Lime Glass

FAQ's
Q: What tolerances do you work to ?
A: The calibration grid is supplied with a certificate traceable to NIST standards. Each grid is gauranteed to a tolerance of +/- 3um positional accuracy measured back to zero datum, or +/- 0.5um measured across the pitch of 25mm from pattern group to pattern group.
Q: How accurate are the features ?
A: The dots and crosshairs will have an overall size tolerance of +/- 3um. if you are calibrating "edge to edge" measurements, you need to factor this tolerance into the returned positions. We can produce tighter tolerances on individual features if required.
Q: Can i have different materials, such as Quartz ?
A: We can certainly offer different materials. However, these are generally much more expensive due to their bespoke nature. Quartz material over 7" in size generally makes the price prohibitive to some customers
Q: I need a different pattern, what can you do ?
A: We are happy to work to your own pattern designs, but bear in mind this will increase costs. Please contact us for further information.


